SSPC-PA 2 Basics
Print this Article | Send to Colleague
SSPC-PA 2 “Procedure for Determining Conformance to Dry Coating Thickness Requirements” is one of the most commonly specified standards for the non-destructive measurement of coating thickness on ferrous and non-ferrous metals.
This article will focus on four critical sections of this standard:
1. Description of gages – calibration, verification of accuracy and adjustment
2. Definitions
3. Required number of thickness measurements
4. Coating thickness restriction levels
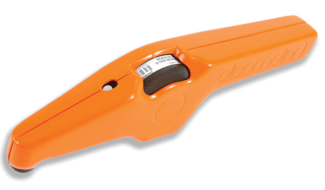
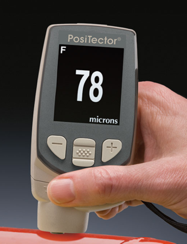
SSPC-PA 2 defines two gage types — Type 1 (magnetic gage) and Type 2 (electronic gage). ASTM D7091 describes three steps necessary to ensure accurate coating thickness measurement: (1) calibration, (2) verification of accuracy and (3) adjustment of coating thickness measuring gages. These steps must be completed before taking coating thickness measurements.
 |
 |
| Type 1 - Magnetic Gage | Type 2 - Electronic Gage |
 SSPC-PA 2 focuses on the proper methods for determining compliance to specified coating thickness ranges. This standard includes the definitions of a gage reading, spot measurement, and area measurement. These terms are often confused. Figure 1 illustrates a 10 m2 (~100 ft2) area.
Gage Reading (Red Dot): An individual instrument reading.
Spot Measurement (Black Circle): The average of three or at least three readings made within a 4 cm (~1.5 in) diameter circle.
Area Measurement: The average of five spot measurements obtained over each 10 m2 (~100 ft2) area (Blue Square) of coatedsurface, or portion thereof.
The number of areas to be selected and measured varies depending on the size of the coated area. SSPC-PA 2 defines three sizes of coated areas:
⦁ Less than 30 m2 (~300 ft2): Measure each 10 m2 (~100 ft2) area.
⦁ 30 m2 (~300 ft2) to 100 m2 (~1,000 ft2): Arbitrarily select and measure three 10 m2 (~100 ft2) areas.
⦁ Exceeding 100 m2 (~1,000 ft2): Arbitrarily select and measure the first 100 m2 (~1,000 ft2) as stated in bullet 2. For each additional 100 m2 (~1,000 ft2) coated area (or increment thereof), arbitrarily select and measure one additional 100 m2 (~1,000 ft2) area.
For example, a coating project is 11,600 ft2. How many areas, spot measurements, and gage readings are needed to comply with SSPC-PA 2?
The first step is to round the total coated area up to the nearest 1,000 ft2. So, for this example, round 11,600 ft2 to 12,000 ft2. Since the total coated area exceeds 1,000 ft2, use bullet 3. The first 1,000 ft2 will be measured as stated in bullet 2 - 3 areas. Next, 1 area for each 1,000 ft2 of the remaining 11,000 ft2 is measured – 11 areas.
3 areas + 11 areas = 14 areas
As defined above, each area measurement contains 5 spot measurements.
14 area measurements X 5 spot measurements = 70 spot measurements
Finally, each spot measurement contains a minimum of 3 gage readings.
70 spot measurements X 3 gage readings = 210 gage readings
How do we determine if the coating thickness meets the specified thickness range? A minimum and a maximum thickness are normally specified for each layer of coating. SSPC-PA 2 provides five thickness restriction levels that are shown in Figure 2. Depending on the coating type and the prevailing service environment, the specifier may select an alternative restriction level for a given project/ Level 1 is the most restrictive and does not allow for any deviation of spot or area measurements from the specified minimum and maximum thickness, while Level 5 is the least restrictive. If no restriction level is specified, then Level 3 is the default.
Figure 2
Let’s assume a coating specification specifies a dry film thickness of 200–250 microns (8–10 mils) at restriction level 3. This restriction level allows a spot measurement to vary from 80% of the minimum to 120% of the maximum specified coating thickness.
200 microns (8 mils) X 0.8 = 160 microns (6.4 mils)
250 microns (10 mils) X 1.2 = 300 microns (12 mils)
Each spot measurement shall be accepted if the coating thickness is within 160-300 microns (6.4–12 mils) in accordance with SSPC-PA 2 level 3.
If you have any further questions, please contact Dane Worms at dworms@sspc.org or Aimee Beggs at beggs@sspc.org.


